08 February 2015

February 2Crafty Layout

 Hi 2Crafty fans!
I'm back to share another layout I recently created.
I love to create my own backgrounds & get messy!
I love to add layer, upon layer, upon layer...

 'Love This View'

2Crafty Products used on this layout:
Fiddlesticks Panel
Line Words - Happiness
 12x12 Alphabet - Dainty

Here's some close ups of my layout...

I've cut the edge border off the 'Fiddlesticks' panel & snipped out a few
other bits to break it up a bit more. I've left this one raw & used my
sewing machine to attach it to my layout.


I trimmed the line word 'love' up to make the ends not as long, 
gave it a couple of coats with gesso & then used a fine black pen
to doodle in some detail. I also used a black ben to colour the word 'view'
in. I grabbed 2 of the off-cuts from the fiddlestick panel & stapled to
either side of my layout, to draw your eyes into the middle focal.

Thanks for popping by :)

And remember, to find a 2Crafty stockist near you, drop an email to...
salesat2crafty@optusnet.com.au

03 February 2015

Guest Designer for Prima Marketing Bloom Girls

Back in July 2014, I was selected to be a Guest Designer for
Prima Marketing 'Bloom Girl'. Needless to say I was
THRILLED!!!!!
I couldn't believe it. So now it's January & my turn to share with you all my
projects I created :) :) *insert happy dance here.

'Be You Always'

 I LOVE to create my own backgrounds. I find it very expressive & calming
to start with a blank sheet. I primed my cardstock with gesso & stamp my
'summer' image using some archival ink. I then began adding my various
mediums to build up my layers. I used acrylic paint to add detail
& colour to my image. With a knife I cut along one side of the image
to allow me to slip my photo in under it. Then I finished off by layering flowers,
brads, thread, enamel dots & alphabets.

Close ups...
 PRODUCTS USED:
Bloom Collection - 'Summer' Cling Stamp
Bloom Collection - Brads
Bloom Collection - Paperclips
Bloom Collection - Flair buttons
Prima Marketing - Flowers
Prima Marketing - Color Bloom 'Gold' spray


'Friends'
 I had a lot of fun making this one! I started off with some gel medium
& used my 'Free Spirit' stencil. Once that was dry, I put a white wash
of gesso over it to pick up the details. With mix of acrylic paints
& sprays I added in my colour. With a sewing machine & some
hand stitching I added a circular element to draw focus to the photo.
I've used lots of different things to build up my layers - old
book paper, paper doily, flowers, thread & even some of my
packaging from Prima products. I cut up strips of the teal
part of the packaging to create journaling strips.
To make the background image 'pop' a little bit, I used a fine black pen
& traced around the image.

Close ups...
 PRODUCTS USED:
Bloom Collection - 'Free Spirit' stencil
Bloom Collection - Brads
Bloom Collection - Metal clips
 Prima Marketing - Flowers


'Don't Stop Creating...Ever'
Art Journal Page

 This was a quick & fun page to do some creative detoxing with.
I used some embossing ink, black embossing powder & Bloom Girl
stamp to start with & then began creating my background. I've used some
paint pens to add colour detail to the image & finished off with some
brush script.

Close ups...
 PRODUCTS USED:
Bloom Collection - Cling Mounted Stamp Two

Hope I've inspired you to get messy & to create something special.

18 January 2015

Life Zesters - January Challenge


 A new challenge blog has just started up & it's called
It's purely a Project Life challenge blog & has great prizes every month.
This month's challenge is:
'Showing your style'

Here is a double page spread that represents my style.
I do my Project Life monthly, rather than weekly.
There's no way I could keep up weekly LOL .

This is my September double layout...


I like to mix cards & love bright colours. I have used a mix of
Project Life, Sn@p & Flutterby Designs cards.

Other things I have used to embellish are:
Flutterby Designs - 6x4 Fussy Cut
Flutterby Designs - Mini Card Fussy Cut
Flutterby Designs - Wood veneers
Flutterby Designs - Photo Cut outs
Posca Paint pens
Sn@p - mini alphas
Amy Tangerine - Thickers
Basic Grey - Mini alphas
Dymo labeller
Tim Holtz - Tiny Attacher
Shipping tags
Hole reinforcer stickers


If you're a Project Lifer - check out this blog & why not enter!?

12 January 2015

SBM Masters Entry 2014


So I wasn't successful this year again for Scrapbooking Masters :(
But that's ok - this year is going to be HUGE!!!!
Now the cat's outta the bag about who is, I can now share my entries...

SINGLE LAYOUT USING 5x7 PHOTO
‘Best Friends Are Like...’

This one actually got an honourable mention :)
AND there is SOOOOOO much Flutterby Designs goodness
thoughout the WHOLE magazine it is FANTASTIC to see!!!!

 
Large photos always challenge me!! With my scrappy style, I usually stick
to 6x4 or smaller. As I create a lot of my own unique backgrounds, I hate
having to cover up something great as soon as I’ve finished it. So I find
small photos still allow a lot of the background to be visiable. Making it
just as important as the photo. I made this photo prop for a recent scrap
retreat & the photos we took were priceless! I wanted to create a layout
bright & colourful - which represents exactly how we were feeling in this
photo. There’s just something about scrapbooking retreats, that’s just
simply just good for your soul. I’ve met so many wonderful people thru
them & to this day I get to call them friends. 
 

Close ups...

 Love this quote - it makes me giggle everytime I read it!!
 MATERIALS USED:
Paper; Crate Paper ‘Styleboard’, Heidi Swapp ‘Vintage Chic’, cardstock.
Embellishments; Gesso, Faber Castell Gelatos & Pitt Pens, Dylusions Ink,
Heidi Swapp Color Shine, Kaszazz stamp, Flutterby Designs flair buttons
& photo cuts, 2Crafty Chipboard, enamel dots, thread, India Ink, Tim Holtz
stapler, Stazon Ink & Dymo Labeller.


SINGLE LAYOUT USING UNCONVENTIONAL ELEMENT
‘Hello You’

I’ve had this paper in my stash for awhile & I really wanted to to give it a
purpose for something awesome. This one certainly challenged me.
I choose to use cut up baby wipes & use plasterers joint tape on my
layout as my ‘unconventional’ elements. The photos are of my 2yr old
running wild in our backyard & wanted to capture the movement in the
photos within my layout. By using different stroke directions, the texture
of the plasterer’s tape & baby wipes, the thread & the paint splats - I think
I capture just that.

 Close ups...


 MATERIALS USED:
Paper; Basic Grey ‘Out of Print’.
Embellishments; Gesso, Faber Castell Gelatos, Gel medium, Dylusions Ink,
Heidi Swapp Color Shine, Prima stitch stamps, Flutterby Designs -
Wood Bits, Flair Buttons & Photo Tabs, Baby Wipes, Plasterer’s Joint Tape,
Posca Paint pens, Watercolours, American Craft - Thickers, thread,
Stazon Ink & Tim Holtz Stencil.


SINGLE LAYOUT USING JOURNALLING AS FOCUS
‘To Live A Creative Life...’

I am seriously in love with brush script at the moment!! This quote is
very relatable & true to me. We over think everything these days, so who
says experimenting creatively with our art has to be perfect or right - but
exactly how we see it. With a competition like this, we are critiquing our
entry before we’ve even finished it, with the fear of what others will think.

I’ve used my favourite things at the moment on this layout:
Gelatos, Dylusions & Color Shine. I love how vibrant they all work together.
While the journalling is the main focus, the veneer frame highlights the
photo & draws you’re eye back over to it. I find that creating my own
unique backgrounds, is fulfilling & I can really make it ‘my own’.

Close Ups...
 MATERIALS USED:
Paper; 7 Dots Studio ‘Dreamer’.
Embellishments; Gesso, Faber Castell Gelatos & Big Brush Markers,
Dylusions Ink, Heidi Swapp Color Shine, Denim Tampons stamps, Kaszazz
stamp, Flutterby Designs - Wood Bits, sewing machine, India Ink, paper
scraps, enamel dots, thread, hole reinforcer stickers, washi tape & Stazon Ink.


ART JOURNAL COVER
‘Create Today’ 


This task is what convienced me to have another crack at Masters this year.
I love art journalling - I find it relaxes me when I can’t find the time to scrap.
I decided to make my own journal from stuff I had lying around my craft room.
I LOVE how it turned out!! It completely suits my style - random & full of character.
The cover had to be teal (it’s my fav) & I wanted to keep the cover arty, but not
over embellished. Bulky items on an art journal cover are not practical when
using it.

I’ve used a Flutterby Designs ‘create’ Flair Button, which has a mixed media feel
to it & Wood Bits ‘ Today’ & Confetti Circles. These embellishments are still quite
flat & aren’t an issue when creating. I’ve also done a few pages in it too...

Close ups...


 MATERIALS USED FOR ART JOURNAL:
Paper; Teresa Collins ‘Memorabilia’, Kaisercraft ‘Base Coat’, Crate Paper ‘Styleboard’,
Amy Tangerine ‘Plus One’, Echo Park ‘Times & Seasons’, watercolour paper, vintage
music sheet, velum, paper bag, calico, Project Life lined & grid 6x4 cards, American
Crafts Cardstock.
Embellishments; Black duct tape, sewing machine.

Cover; Vintage lace, Gesso, Liquidtex paint, Dylusions Ink, Faber Castell Gelatos,
Gel Medium, Tim Holtz Stencil, Flutterby Designs Wood Bits & Flair Button,
enamel dots, thread, Kaisercraft small alphas & Glossy Accents.

2Crafty Chipboard - January Share

Let me be the first to say 'HAPPY NEW YEAR'!!!! 
I cannot believe how fast last year went. My little man just turned 3 & #.2
is only weeks away from arriving (arrggg scary LOL).
This layout sort of represents last year in a way. I have met soooo
many wonderful people thru this hobby & I'm lucky enough to have made lots
of new friends.

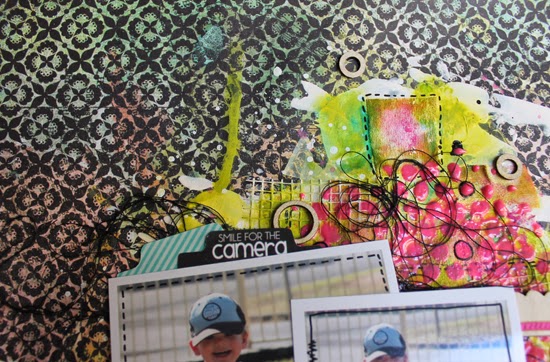
I have SO many selfie shots just like this from retreats, I thought it was time I scrap
some of them. Of course I have used some AWESOME 2Crafty chippy!! :)

 'You & Me'

Here are some close ups...
 The Hessian Patch, I've used a variety of acrylic paints & sprays to colour it.
I've also layered lots of messy black thread under the chipboard & used
a Flutterby Designs flair button & page tab cut-out to embellish it.

The title 'You & Me', I completely covered in a few coats of gesso
& then used a black posca pen to colour in,as well as the the ampersand.
Once that dried, I used a white Uniball pen to add some faux stitching
to add extra detail. I then grabbed some glossy accents & covered the
two words.
The mini camera was done the same way. I have left the 
bits of the circular panel 'raw' & tucked in behind the other layers.

I love how much texture this layout has!! I've used the 'Words of Wisdom'
Stencil from Flutterby Designs.
Here are the chippy pieces I used to create this layout:
Mini Cameras

Title 'You & Me'

Hessian Patches

Circular Panel
 
  I hope I've inspired you to pull out some 2Crafty chippy & get messy!!